
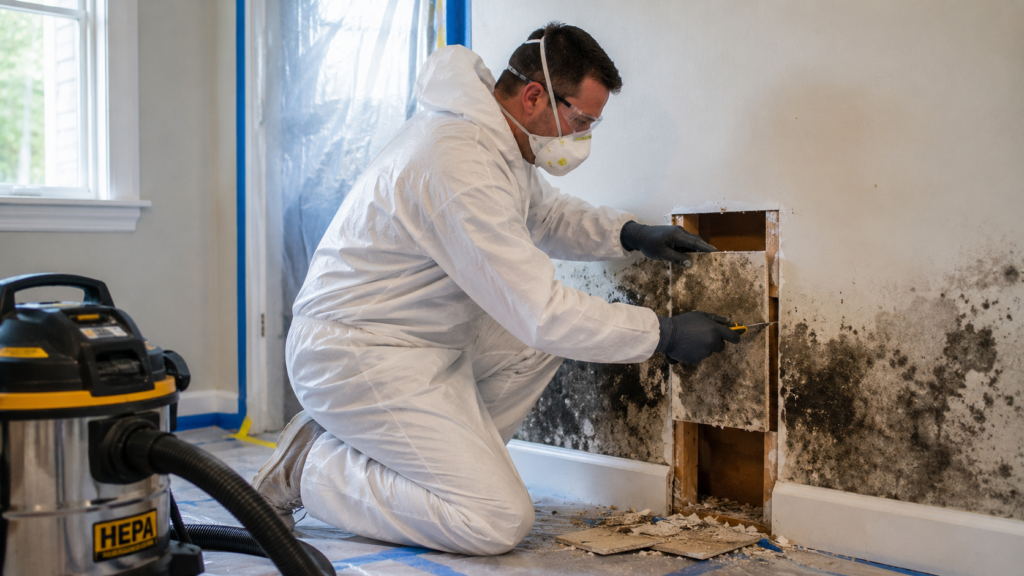
If you’ve pulled back a piece of furniture or peeled off wallpaper and found dark, fuzzy patches on your drywall, you’re not alone – and you’re not necessarily looking at a disaster. But you are looking at a decision point. Small mold spots on drywall can sometimes be handled carefully by a homeowner. Larger infestations, especially ones tied to a past water event, usually cannot – and treating them like a weekend DIY project can make things significantly worse.
This guide walks through how to safely assess and remove small areas of moldy drywall, the mistakes that turn a manageable problem into an expensive one, and the clear signs it’s time to stop and call a professional. If you’re dealing with active water damage right now, don’t wait – call Water Damage Restoration FW at (817) 755-5734 for 24/7 emergency help in Fort Worth and Tarrant County.
Why Drywall and Mold Are Such a Common Pair
Drywall is essentially compressed paper and gypsum – and paper is one of mold’s favorite food sources. In Fort Worth’s humid summers, combined with sudden storms, burst pipes, and slow roof leaks, drywall rarely gets the chance to dry out completely before a spore colony takes hold. Mold can begin growing on damp drywall within just 24 to 48 hours, which is why the timeline between “water event” and “moldy wall” is often shorter than homeowners expect.
If the mold you’re looking at traces back to a leak, flood, or burst pipe, it’s worth reading about our structural drying solutions – because until the underlying moisture source is fully addressed, any mold removal you do is temporary.
Step 1: Confirm It’s Actually Mold (and How Bad It Is)
Not every dark spot on drywall is mold – sometimes it’s just dirt, soot, or old water staining. Mold typically has a fuzzy or slightly raised texture, a musty smell, and spreads outward in an irregular pattern rather than a clean stain line.
Size matters here. The EPA generally considers mold patches under about 10 square feet (roughly a 3-foot by 3-foot section) to be within range for a careful DIY cleanup, assuming you’re not immunocompromised, pregnant, or dealing with a chronic respiratory condition. Anything larger, or mold that keeps returning after cleaning, points to a moisture source still active behind the wall – which means it’s time for a moisture detection inspection rather than another round of scrubbing.
Step 2: Protect Yourself Before You Touch Anything
Mold spores become airborne the moment you disturb the material they’re growing on, and drywall removal disturbs them significantly. Before starting:
- Wear an N95 respirator at minimum (a dust mask is not sufficient)
- Wear gloves and safety goggles without ventilation holes
- Open windows if possible, but close doors to the rest of the house to prevent spores from spreading
- Turn off central HVAC while working so spores aren’t pulled into your air ducts and distributed throughout the home
If you’re at all concerned about air quality in the rest of your home after a mold discovery, our air quality testing service can confirm whether spores have already spread beyond the visible area.
Step 3: Contain the Work Area
Before cutting into drywall, tape plastic sheeting over doorways and vents leading out of the room. This single step prevents the single most common DIY mistake: turning a one-room mold problem into a whole-house one by carrying spores out on clothing, tools, and air currents.
Step 4: Remove the Affected Drywall
For small, contained areas:
- Cut out the moldy section with a utility knife or drywall saw, extending your cut at least 12 inches beyond any visible mold or staining – mold often grows further than it’s visible on the surface.
- Bag the removed drywall immediately in heavy-duty plastic bags and seal them before carrying them out of the room.
- Vacuum the area with a HEPA-filter vacuum – a standard shop vac will blow spores back into the air rather than capturing them.
- Wipe remaining surfaces (studs, framing) with a mold-killing solution and allow them to dry completely before patching.
Only replace the removed section once you’re confident the framing behind it is completely dry. If you’re unsure whether the studs are actually dry or just look dry, that’s exactly the kind of hidden moisture our thermal imaging scans are built to catch – surface appearance is often misleading with lumber and framing.
Step 5: Prevent It From Coming Back
Once the area is repaired, consider whether standard drywall is the right replacement material for that spot. In bathrooms, laundry rooms, or any area with elevated humidity, mold-resistant drywall (sometimes called “green board” or “purple board”) is worth the modest price difference. It won’t make a space mold-proof, but it significantly slows fungal growth compared to standard paper-faced drywall – a smart upgrade if you’re already opening the wall for repairs, and something our drywall removal and replacement team can install correctly during a full repair.
When You Should Stop and Call a Professional
DIY mold removal has a real ceiling, and pushing past it usually costs more in the long run than calling for help upfront. Here’s when to stop:
The affected area is larger than about 10 square feet. Beyond this size, the EPA and IICRC both recommend professional remediation. Larger infestations require containment methods, negative air pressure, and equipment that isn’t available at a hardware store.
The mold keeps coming back after you clean it. This almost always means there’s an active moisture source you haven’t found yet – a slow pipe leak, a roof issue, or condensation inside the wall cavity. Our team can pair moisture detection inspection with antimicrobial treatment application to actually solve the root cause instead of masking it.
You smell mold but can’t see it. Musty odors without visible growth usually mean mold is developing inside a wall cavity, under flooring, or in an HVAC system – areas that require specialized detection tools to locate safely.
The mold followed a flood, sewage backup, or major leak. Water damage from these events often contaminates more than what’s visible on the surface, and our mold remediation experts are equipped to handle both the visible mold and the moisture conditions that caused it.
Anyone in the home has asthma, allergies, or a compromised immune system. Professional containment protects vulnerable household members far better than open-room DIY work.
You’re dealing with an older Fort Worth home. Homes in areas like River Oaks, Fairmount, and the Stockyards Historic District often have original plaster, older insulation, or outdated wiring behind the drywall, which changes both the removal process and the safety considerations. A professional inspection is the safer starting point in these properties.
Serving Fort Worth and Tarrant County
Whether you’re in Haltom City dealing with mold after a fire-and-water event, in Grapevine after a storm, or anywhere across our full service area, Water Damage Restoration FW responds within 60 minutes for water and mold emergencies. If your moldy drywall traces back to a recent storm, check out our flash flood emergency checklist for what to do in the first 24 hours after water enters your home.
The Bottom Line
Small, isolated mold spots on drywall – under about 10 square feet, with no lingering odor and no history of major flooding – are usually safe to handle yourself with the right protective gear and containment steps. Anything larger, recurring, tied to a flood or sewage event, or affecting a vulnerable household member calls for professional remediation. Guessing wrong in either direction either wastes money on an unnecessary contractor visit or, more commonly, lets a hidden moisture problem keep spreading behind your walls.
If you’re not sure which category your situation falls into, that uncertainty is reason enough to get a professional opinion. Call Water Damage Restoration FW at (817) 755-5734 for a free inspection – we’ll tell you honestly whether it’s a DIY job or not.
Leave a Reply